It is no secret that a huge part of my approach as a sciatica specialist physical therapist is providing people with the right sciatica exercises! If the exercises given are appropriate, they can lead to truly significant sciatica pain relief.
However, it’s not always easy to choose the right sciatica exercises. There is no “one-size-fits-all” approach.
That being said, in this article, I’ve picked 9 of the most effective exercises for sciatica pain (with pictures) to show you today. You’ll find pictures of sciatica exercises as well as videos for each. I’ve also included a handy guide for choosing which sciatica exercises MIGHT be suitable for certain injuries. You’ll find a guide to the number of repetitions and sets I usually recommend for each exercise below the pictures.
But first, an important note: Not all of these exercises will be right for everyone and choosing the right sciatica exercises is often a game of trial and error. You should check with your doctor before starting any of these exercises for sciatica.
As always, I recommend to everyone that these exercises should be pain-free at all times. You can read about why I tell everyone this by clicking here. If you find one of the following exercises painful, simply stop and choose another instead.
Before we dive in, please be aware that we are part of the Amazon Affiliate programme. This page may contain Amazon affiliate links, so if you choose to purchase a product for your sciatica that we recommend through a link on this page, we will receive a small commission at no extra cost to you. This helps us keep Overcome Sciatica alive! Thank you for your support. Please be assured that we only ever recommend products that we truly believe can help.
How to use this guide:
These exercises are provided for informational purposes only and are not designed to be a ‘prescription’ of any kind. Be sure to check with your healthcare provider before you begin any new exercise programme. As everyone will have different requirements, no one should be doing all of the exercises on this page! Get personal advice first from a doctor before beginning any new exercise programme. Change any exercise that worsens your pain.
First, it’s important to ask the question “Should I be doing ANY sciatica exercises right now? Or would rest be better?”
I’ve answered this question in the video below:
So, once you’ve watched the video above, let’s have a look at some of my most effective sciatica exercises for pain relief:
The 9 Best Sciatica Exercises for Sciatica Pain Relief (with pictures)
#1 – Happy Cat/Angry Cat
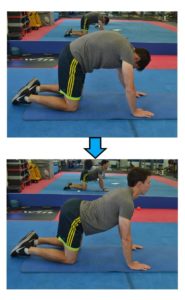
Instructions:
- Begin on all fours, supported by your hands and knees
- Start off by rounding your shoulders and tilting your head forward so as to look towards your knees
- Try to push your shoulder blades apart from each other as you round your shoulders further, hollowing your tummy out at the same time. You should feel your lower back round as your tummy gets further away from the floor.
- Now move in the opposite way. Arch your back as you lift your chin and bring your shoulder blades together again
- Alternate between these two positions for 30-seconds, being sure to make the transition between them as smooth as possible.
- Repeat this exercise 2-3 times per day
Who this exercise for sciatica is for:
This exercise will be useful for most people with back pain or sciatica, so long as they can get onto the floor safely. Anyone doing this sciatica exercise should only persist with this exercise if it doesn’t cause back pain or sciatica to worsen.
Why this exercise works:
This exercise is a way of doing something called “nerve flossing”. You can read all about nerve flossing here.
The way your are alternating your back between an arched position and a rounded position leads to your spinal cord and sciatic nerve sliding through tight spaces in the back and legs. Doing this repeatedly can help to free up any entrapments along the course of that nerve, and help to provide sciatica pain relief. Less entrapment and smoother mobility of the nerve leads to less pain!
This exercise can usually be thought of as a “safe” sciatic nerve movement for most people.
#2 – Cobra Pose
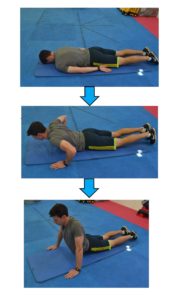
Instructions:
- Begin laying face-down on a firm surface like a mat on the floor or a hard mattress
- Place your hands in line with your shoulders and gently push up, raising your torso off the floor
- Keep your hips down on the floor
- Only go as far as is comfortable – no need to get to full extension for a benefit!
- Gently lower yourself to the starting position and repeat up to a maximum of 10 times.
- Do a set of these 3-4 times per day
Who this sciatica exercise is for:
Usually, people suffering with a disc bulge find this exercise one of the most useful for improving their symptoms. However, regardless of what is causing sciatica, one should only persist with this exercise if it is comfortable to perform this movement. This exercise is often a good place to start for those who have trouble bending forward.
Why this sciatica exercise works:
This exercise works because it involves movement of the lower back which encourages blood to flow to the injured area so healing can occur. Some researchers also believe this exercise causes a disc bulge to “centralise” into the disc where it can’t pinch on a nerve root.
#3 – Knee Hugs
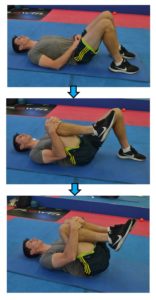
Instructions
- Lie on a mat on the floor or on a firm bed with both knees bent halfway.
- Slowly raise one knee up towards your chest and secure it with a hand
- Raise the other leg up and secure this one as well
- Gently pull in towards your chest, allowing your lower back to slightly relax
- One leg at a time, return to the start position
- Repeat this 8-10 times, every 2 hours if you find it provides sciatica pain relief
Who this sciatica exercise is for:
This exercise is great for many kinds of back pain. I use this one especially frequently as an exercise for older people who have sciatica as a result of spinal stenosis. You may find this one difficult if you have a disc bulge, so avoid if it aggravates your symptoms.
Why this sciatica exercise works:
It allows the lower back to relax and alleviates tension associated with the tight muscles around the lumbar spine. This exercise relieves tension on a compressed nerve root in people with age-related deterioration of the spine by tilting the pelvis away from the painful position.
#4 – Knee Rolls
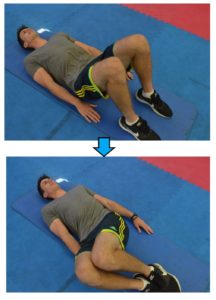
Instructions:
- Lie on your back on a mat or a firm mattress
- Bend your knees up halfway
- Slowly and gently, allow both knees to roll over to one side only as far as is comfortable
- Bring your knees back to the start position, then allow them to roll over to the opposite direction
- Repeat for 30-seconds total, don’t rush the repititions and try to find a rhythm
- Try to find time to do this exercise every 2-3 hours if you can
Who this sciatica exercise is for:
This exercise is great for relieving any tension in tight muscles in the lower back. It is also a great way to begin to regain any lost rotation in the lower back following sciatica.
Why this sciatica exercise works:
By gently encouraging a slow, controlled rotation of the lower back, the muscles in your lower back will realise that it is OK to relax a little. This will often bring about low back and sciatica pain relief.
#5 – Sciatic Nerve Flossing
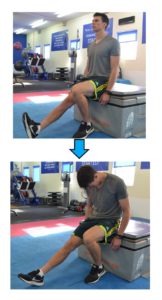
Instructions:
- Start sitting perched on the edge of a seat or bed with one leg out in front of you
- One should perform this exercise on the LEAST PAINFUL of the two legs. Try both sides and stick with the more comfortable one
- As you pull the toes of the extended leg up towards your head, raise your chin and look slightly up towards the ceiling (1st picture)
- Then, drop your toes down away from you and drop your chin down at the same time (2nd picture)
- Alternate between these two positions for 30-seconds at a time.
- Repeat for 3 sets, spread evenly throughout the day.
Find all our Sciatica Videos on YouTube HERE!
Who this sciatica exercise is for:
This exercise can work really well for many types of sciatica and it is often my starting point for people suffering from a disc bulge or prolapse.
Why this sciatica exercise works:
This exercise provides pain relief by literally “flossing” a trapped nerve through tight spaces in the back and legs. As you pull your toes up, you put tension on the sciatic nerve; however, by also raising your chin, you can remove tension from the opposite end of the spinal cord, thus preventing this from being painful (nerves hate to be stretched). You’ll also be adding tension by dropping your chin, but relieving it again by letting your toes drop away from you.
NEVER pull your toes up and drop your chin down at the same time with sciatica – this is the position that puts most tension on the nerve and will aggravate symptoms.
In a way, this exercise is one of the only “sciatic nerve stretches” that is unlikely to aggravate sciatica.
#6 – Seated Flexion
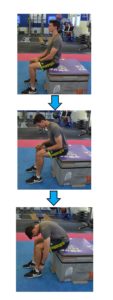
Instructions:
- Start sitting perched on the edge of a seat or bed
- Support the weight of your body by putting your hands on your thighs
- Gently, start to lean forward by bending the spineand letting the lower back relax
- Slide your hands down your legs, going as far as is comfortable
- Slowly return to the start position
- Repeat up to 10 times in a row, trying to perform this exercise every few hours
Who this sciatica exercise is for:
This exercise works really well for most people with a facet joint problem.
It is also good for SOME people with disc issues, but it can also aggravate a disc problem in some people – so it is definitely to be avoided if it isn’t comfortable. I tell my clients there is no need to go all the way down to the floor like in the final picture; going halfway will be enough for most.
Why this sciatica exercise works:
This exercise works in the same way as #3 where it will decompress the spine, offloading pressure on a nerve root if age-related changes are the culprit for your pain. For most, it is also a very safe way to regain forward motion of the spine. Most people should do this exercise at some point in their rehabilitation – but only when it becomes non-painful.
This is a particularly good exercise for spinal stenosis. You can find more tips for management of spinal stenosis here.
#7 – McKenzie Side Bends

Instructions:
- Start standing next to a wall. Most people prefer to do this exercise with their painful leg being the one FURTHEST AWAY from the wall. However, try both sides and see which one is most comfortable for you – stick with that one.
- Use your elbow and forearm to support yourself so you are leaning on the wall (1st picture)
- Slowly and gently, let your hips “glide” towards the wall while keeping your feet in the same position.
- Only go as far as is comfortable, then return to the start position.
- Repeat this 10 times, have a break, and do 3 sets total.
- If this exercise has worked for you, you may feel rapid relief in the painful leg and possibly slightly worsening back pain – rest assured this is a normal phenomenon.
Who this sciatica exercise is for:
This exercise works well for disc problems and is a mainstay for a treatment approach called “McKenzie”. If someone has pain in one leg only from a disc bulge or prolapse, I often get them to try this exercise. It brings significant sciatica pain relief to many people and can work rapidly.
Why this sciatica exercise works:
The McKenzie approach claims to work by encouraging the inner disc material (called the “nucleus pulposus”) to re-centralise into the middle of the spinal disc. Whether or not this actually occurs hasn’t been proven in scientific literature but I have seen this exercise provide relief for many. I tell my clients to be sure to choose the direction that is least painful when performing this exercise.
#8 – Standing Extension
Instructions:
- Start standing normally.
- Gently try to lean back. Only go as far as is comfortable.
- If you feel able to, use your hands to provide support in the lower back allowing you to extend further (3rd picture)
- Slowly return to the start position
- Perform up to 10 repetitions, every few hours or so. Cut your set short as soon as you reach the first signs of pain.
Who this sciatica exercise is for:
This is often a great exercise for a disc bulge. It works especially well for people who have trouble leaning forward and is a more user-friendly/convenient version of #2 on this list. However, I find it to be slightly less effective compared to the Cobra pose, as I find people tend to rely more on pelvic rather than spinal movement with this one, thus reducing its effectiveness. One should AVOID this exercise if they suffer from arthritis of the lower back or spinal stenosis.
Why this sciatica exercise works:
This exercise works in a similar way to #2 – it involves movement of the lower back, encouraging blood to flow to the injured area so disc healing can occur. This exercise may help a disc bulge to “centralise” into the disc where it can’t pinch on a nerve root.
#9 – Standing Side Bends
Instructions:
- Start standing normally. Try this exercise on the right and left and stick with the most comfortable one.
- Run your right hand down your right thigh as far as is comfortable.
- Gently return to the starting position.
- Repeat 10 times, up to 3 times per day.
Who this sciatica exercise is for:
This exercise is great for a range of causes of sciatic nerve pain and can help to loosen a stiff back. Most people have one side (right or left) where doing this exercise is painful, and non-painful for the other. I tell my clients to always stick with the non-painful side. This exercise is a good choice for many people who get pain when bending forward AND leaning back.
Why this sciatica exercise works:
By relieving tension in the lower back and stretching out the muscles that run vertically along the spinal column, some can achieve effective sciatica pain relief with this exercise. It works well for people who find that they “shift” away from their painful leg and can help to reduce the pain causing this movement away from the painful side.
** Bonus: Sciatica Stretches (with pictures) for Pain Relief **
In addition to the exercises above which are superb for providing sciatica pain relief over a period of time, there is another “family” of sciatica exercises that we haven’t spoken about yet.
These are sciatica stretches for the muscles in the legs.
Stretching the muscles in the legs can be a highly effective way to achieve sciatica pain relief. This is because, when are suffering from sciatica, your mobility in the back and legs is affected (I’m sure you’ll have noticed this in some of the exercises above).
When we are left with poor mobility for any length of time, the muscles in the legs can shorten and become tight. This can lead to a “pulling” effect on the pelvis.
This “pulling” can place extra strain on the pelvis and cause it to “tilt” either forward or back, depending on the affected muscle group. This puts the lower back in a disadvantaged position and can lead to worsening back pain and sciatica.
Luckily, these bonus sciatica exercises might be useful in reducing this effect!
One thing you should be aware of: Some of these stretches may aggravate your sciatica, while some will make you feel much better. As with the other exercises, be sure to check with your healthcare provider first before adding any of these into your routine. Always avoid stretches that are painful.
Makes sense? Let’s go over some of the leg stretches that are particularly useful for sciatica…
Sciatica Stretch #1 – The Gluteal Stretch
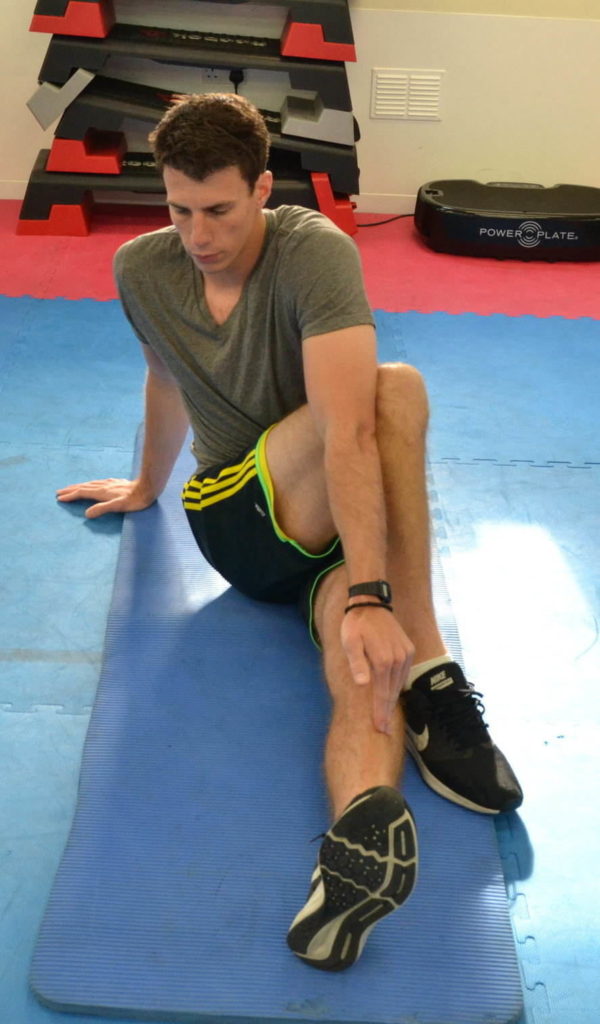
Instructions:
- Start sitting on the floor or a comfortable surface like a soft mat.
- You are going to be stretching the NON-PAINFUL SIDE for this exercise; when we stretch the non-painful side, we can avoid aggravating the painful area and balance the pelvis off in a technique known as Total Motion Release.
- Cross your non-painful leg over the painful leg
- Using your arm as shown, reach through to the inside of your non-painful leg and pull your knee towards the opposite shoulder.
- You should feel a stretch in the buttock region of the non-painful side
- Hold for 30-seconds, repeating 5-6 times per day.
Who this sciatica exercise is for:
This exercise is great for most people who feel sciatica symptoms in their buttock. It is also a great exercise for people who are suffering from piriformis syndrome. However, this stretch can help people with sciatica from many kinds of different causes. The gluteals (or buttocks) get very tight in people who stand with a number of different, common postures and most people should stretch them regularly.
Why this sciatica exercise works:
By relieving tension in the gluteals and allowing the pelvis to find it’s natural “balance”, the pressure on the lower back and the sciatica nerve is reduced. This allows a better range of motion in the spine with bending and twisting, plus more freedom for the leg to swing when walking.
Stretching the non-painful side in this exercise is a great method to avoid worsening symptoms while still getting relief.
Sciatica Stretch #2 – The Piriformis Stretch
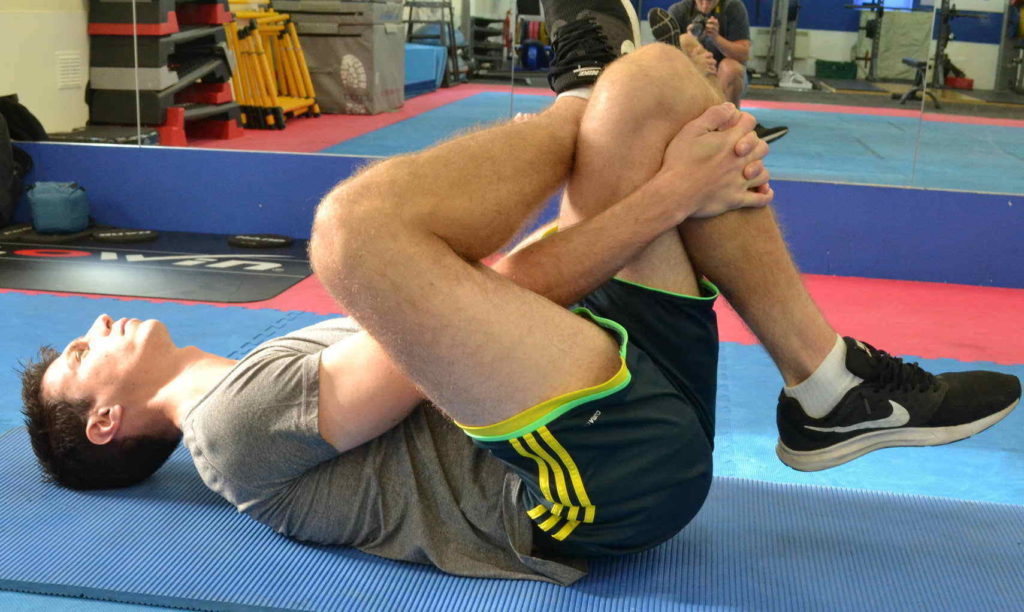
Instructions:
- Start laying on the floor or on a comfortable surface like a soft mat.
- As with the sciatica exercise above, you are going to be stretching the NON-PAINFUL SIDE for this exercise
- Bend your painful leg half way (In the above picture, the LEFT leg is the painful side)
- Cross your non-painful leg over the painful leg as shown
- Using your arm as shown, reach through to the shin of your painful leg and pull both your legs towards you
- You should feel a stretch in the buttock region of the non-painful side
- Hold for 30-seconds, repeating 5-6 times per day.
Who this sciatica exercise is for:
This exercise is very similar to stretch #1, except the muscle that is being stretched here is slightly different to the gluteals (even though they sit near to one another). The muscle being stretched here is the “Piriformis”, a small muscle that lies deep in the buttock. It gets tight in runners and people who sit for long periods of time and needs stretching regularly.
This is often a KEY exercise for people who have piriformis syndrome – a condition where the piriformis muscle gets tight and “pinches” on the sciatic nerve.
Why this sciatica exercise works:
By releasing a tight, unhappy piriformis muscle, the pelvis can work more efficiently. The trapped sciatic nerve within the piriformis is also allowed to be released. With this stretch, again I usually start off by stretching the NON-PAINFUL side first. We do this to avoid aggravating the sciatic nerve in the painful leg, which is already compressed by the tight piriformis. By releasing the non-painful piriformis, the pelvis is given some “slack”, allowing the tight side to relax as well.
Sciatica Stretch #3 – The Hip Flexor Stretch
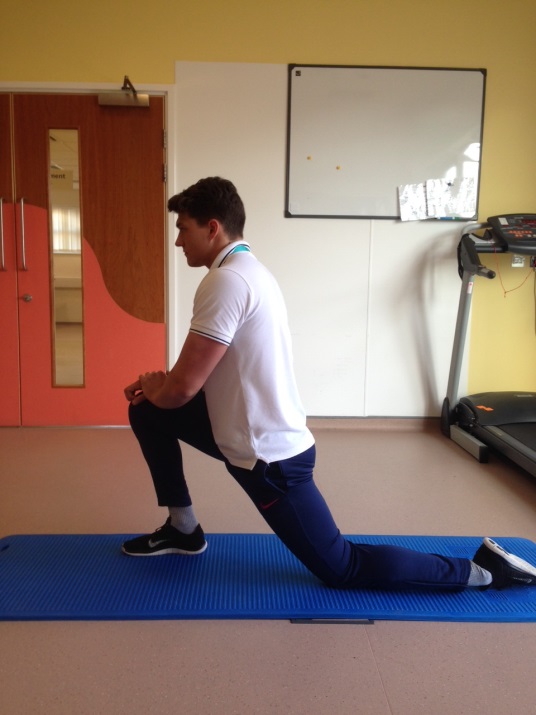
Instructions:
- Start with a mat on the floor, allowing you to rest the knee of your painful side on it
- Kneel in the position shown, with your good leg bent up and on the knee of your painful side
- Put your hands on your good knee, and gently lean forward, leaving the knee of your painful side behind you
- You should start to feel a tightening of the area at the front of your hip on the painful side
- When you feel the stretch, stop and hold for 30-seconds. Repeat this 5-6 times per day.
Who this sciatica exercise is for:
This exercise is great for releasing tension at the front of the hip for people who sit for a long period of time or people who stand with what we call an “anterior pelvic tilt”. Someone that stands with an anterior pelvic tilt gives the appearance of a rounded lower back and a sticking-out bum. Even though this is a normal posture, it can place pressure on the joints and discs in the lower back as the hip flexors get tighter and tighter.
Why this sciatica exercise works:
This exercise works because it releases a tight hip flexor – which has been shown to decrease pressure on the spine. Tight hip flexors can cause a build up of force at the back of the vertebral joints, placing unnecessary stress through the spine and leading to back pain (and in many cases, sciatica). With this exercise, we are stretching both the good and the bad sides rather than just the good side. Why? Because if only one hip flexor is stretched, there will be an unequal pull from the right and left sides. This exercise is also unlikely to aggravate sciatica in most people.
Conclusion
Although those are 9 of my most prescribed sciatica exercises, I have only just covered the tip of the iceberg when it comes to exercises that can provide sciatica pain relief.
In reality, there are many different exercises you can choose from, and different exercises work for different people. However, there is one particular programme I have found with a much higher success rate than most.
My good friend, colleague and fellow international sciatica expert, Dean Volk, offers this programme in his Sciatica Relief Now course, which you can find details on below:

Check out Dean Volk’s “Kicking Sciatica OUT of the Butt!” Online Pain Relief Course Here!
I can proudly recommend Dean and his course for sciatica sufferers – because I’ve seen his incredible results first-hand. You can check out his course (and get lifetime access to the videos and bonus content) by clicking HERE.
What did you think of these sciatica exercises? Did you find any that are helpful? Let me know which one you found the best in the comments section below!
The information on Overcome Sciatica should never be used as a substitute for medical advice from a doctor. Never put into action any tips or techniques from Overcome Sciatica without checking with your doctor first. Please see full terms of use here.



I do a lot of these exercises and they do help but the stretches I really can’t do too many of them because of our rheumatoid arthritis limits me from doing a certain movement
Don’t worry about the ones you can’t do – usually just picking one or two that help is enough to get things moving in the right direction!
There are a lot of different exercises . Hopefully I will find a couple to help ! Thank you ! Keep moving seems to be the answer ! Tylenol doesn’t help .